
23
2015
Online Accounting and billing system for consulting service
If you have a consulting business or work as a freelance consultant, and whether you are an Engineering consultant, Business consultant, Educational consultant or any other field and you charge your clients per hour or per service, OnlineInvoices gives you the power to make a customized invoice to suit the services you provide and create ‘hourly rate’ based invoices, or invoice your client by project.
To start invoicing your clients register for a free account on OnlineInvoices Billing and Accounting Software, or if you are in a hurry use our free Consulting Invoice Template
In this tutorial we will describe :
- How you can use OnlineInvoices to add new clients.
- Add your services.
- Send quotes to your clients.
- Create invoices and invoice your clients for services you provide as well as your products.
- Receive online payments for your invoices to your favourite payment gateway.
- Track your time and charge your clients based on those hours.
First you will need an account in OnlineInvoices. Login to your account or Register for a free account now.
Adding New clients to your system:
- From the”Clients” menu choose “Add New Client“.
- Add the new client’s details: Please Note the only required fields are (client business name, client number – and client email address if you choose the “Send Via Email” invoicing method).
- Complete the “Client Details” field: check this for more info How to Add New Clients in Online Invoices.
- Click on the Save button to save the new client.
After you complete adding your clients you can start listing the services that you provide (and/or your products, if you are also providing other material/products for their use).
Adding your services.
- From the”products” menu choose “Create product“.
- Add your service details: check this for more info How to add new products in Online Invoices.
- Click on the Submit button to save the new product.
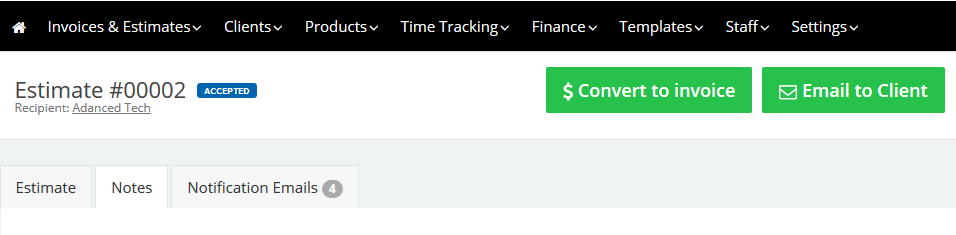
Quote your Consulting service fee and send it to your client.
- From the “Invoices” menu choose “Estimates”.
- Click the “New Estimate” button.
- To get in-depth info about creating estimates visit: Creating Estimates in the Online Invoices System .
- After filling out the estimate with your service info click the “Save & Send Email” button.
- Your client will receive the estimate by email and will have the power to accept the estimate and add notes if required via that email.
- When your client receives the estimate and accepts it you will receive an email notifying you of the update.
- When opening the invoice it will be marked as accepted, and simply click the “Convert to invoice” to generate an invoice based on this estimate
- Once you generate the invoice you can edit it or add more fields. Check this link: Create Your first invoice to get in depth knowledge of creating invoices.
- To receive payments online for your invoice you will need to set up a payment gateway.
Check these links and configure your gateway:
If you are running a large business with many employees and need to track and invoice for their tasks you can use our special staff and time tracker features.
Track your time
Many consultants invoice their clients for the hours they worked. You will be able to use the OnlineInvoices Online Time Tracker to track your time in projects and activity based and create an invoice highlighting the hours you added and the rate for each hour.
Before you can start tracking your time you will need to create a project and an activity.
Start tracking your time:
- From the “Time Tracking” menu choose “Time Tracking“.
- Choose a day from the calendar.
- Click the “New Entry” button.
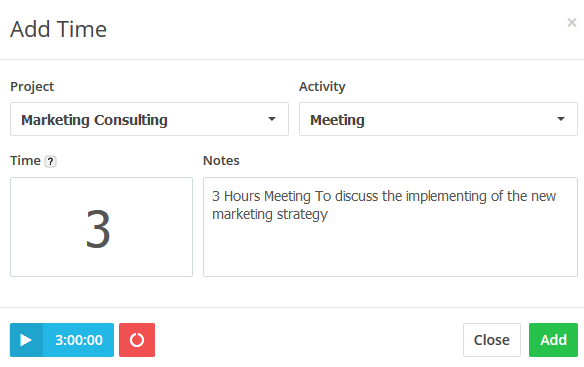
- Select a project and an activity, and add your time manually in the “Time field” or start the timer.
- Add any notes related to the task.
- Click the “Add” button.
To Create an Invoice Using the Time-sheet:
To generate a time invoice highlighting all the hours you added in a certain project, activity or time period:
- From the “Time Tracking” menu choose “Generate Invoice“.
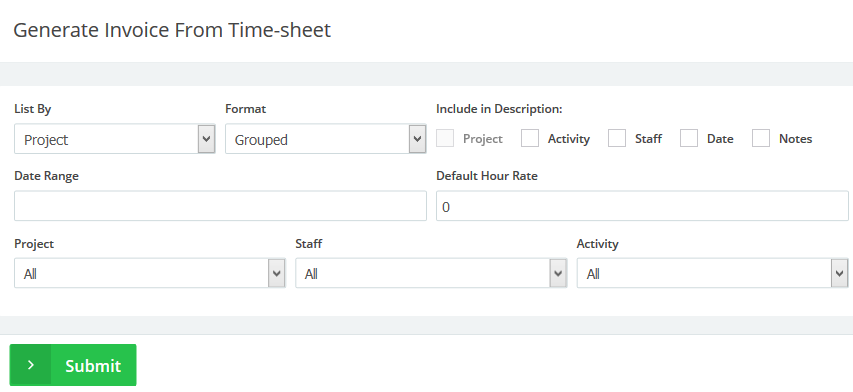
- The Settings
- List By : Choose to list and show project by, activity, staff or date.
- Format: Choose whether you need the items in details -every added time in a separate row- or grouped by project, activity, staff or date range.
- Include in the description : tick any check box you will need to add on the description field of the item on the invoice: Project, activity, staff or by date range.
- Choose a date range you want to invoice for. If left blank all unbilled hours for the project will be invoiced.
- Default Hour Rate: Add the default hourly rate for the hours you will add in the invoices. The rate can be charged separately for each item in the invoice
- Project: Choose a project you want to invoice for the time worked on it.
- Staff: Choose a certain staff member to invoice for the time he/she added.
- Activity: Choose an activity you want to invoice for the time worked on it.
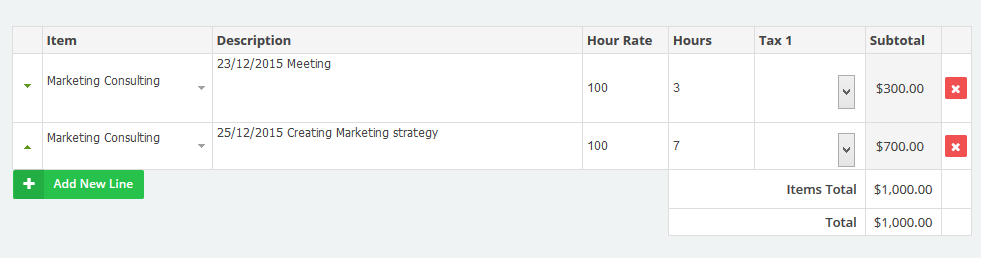
- Click “Submit” to generate the invoice; once you generate the invoice you can complete its data as any normal invoice, like choosing a client or adding special fields, etc.
Start managing your accounting tasks. Simply register for a free account on OnlineInvoices Billing and Accounting Software or if you are in a hurry use our free Consulting Invoice Template
Contact us if you have an issue or more questions.
Archives
- October 2022
- June 2022
- May 2022
- April 2022
- February 2017
- November 2016
- October 2016
- July 2016
- June 2016
- April 2016
- March 2016
- February 2016
- January 2016
- December 2015
- November 2015
- October 2015
- July 2015
- June 2015
- May 2015
- April 2015
- March 2014
- October 2013
- August 2013
- June 2013
- May 2013
- January 2013
- December 2012
