
23
2015
Online Accounting and Billing for Photography Business
In order to run his business successfully, a skilled photographer with an active photography business will have to deal with many clients, manage his equipment, software and other business tools, upgrading them to follow the rapid changes in new technologies. Most of any photographer’s time is taken up at photo sessions, reviewing the photos and editing before delivering the outcome to his clients. This often leaves him (or her) with almost no time to manage accounting data – the key to business survival.
Using the ‘old way’ of doing financial and accounting tasks, invoicing clients will leave the business operator with almost no time, but with OnlineInvoices’s Online Invoicing and accounting system invoicing and the associated accounting processes will be done in few minutes. OnlineInvoices is specifically targeted to meet the needs of small business – especially the skilled technician and artist.
To start managing your accounting tasks register for a free account on OnlineInvoices Billing and Accounting Software, or if you are in a hurry use our free Photography Invoice Template.
In this tutorial we will highlight:
- How you can use OnlineInvoices to add new clients.
- Add your services.
- Add your business expenses and track them.
- Send quotes for your services to your clients.
- Create invoices and invoice your clients for the services you provide.
- Receive online payments for your invoices straight to your favourite payment gateway.
- Add staff members to help you manage your business.
- Track your time (and your staff’s time) if your are charging your clients hourly rates.
- Create advanced reports to track how your business is going and your profit or loss over certain time periods.
First you will need an account with OnlineInvoices. Login to your account or Register for a free account now.
Adding New Clients To Your System
- From the”Clients” menu choose “Add New Client“.
- Add the new client’s details: Please Note: the only required fields are (client business name, client number and client email address if you choose the “Send Via Email” invoicing method).
- Complete the “Client Details” field: check this for more info How to Add New Clients in Online Invoices.
- Click on the Save button to save the new client.
After you complete adding your clients you can start listing the services that you provide.
Adding Your Services and Products Details
- From the”products” menu choose “Create product“.
- Add your product or your service details – check this for more info How to add new products in Online Invoices.
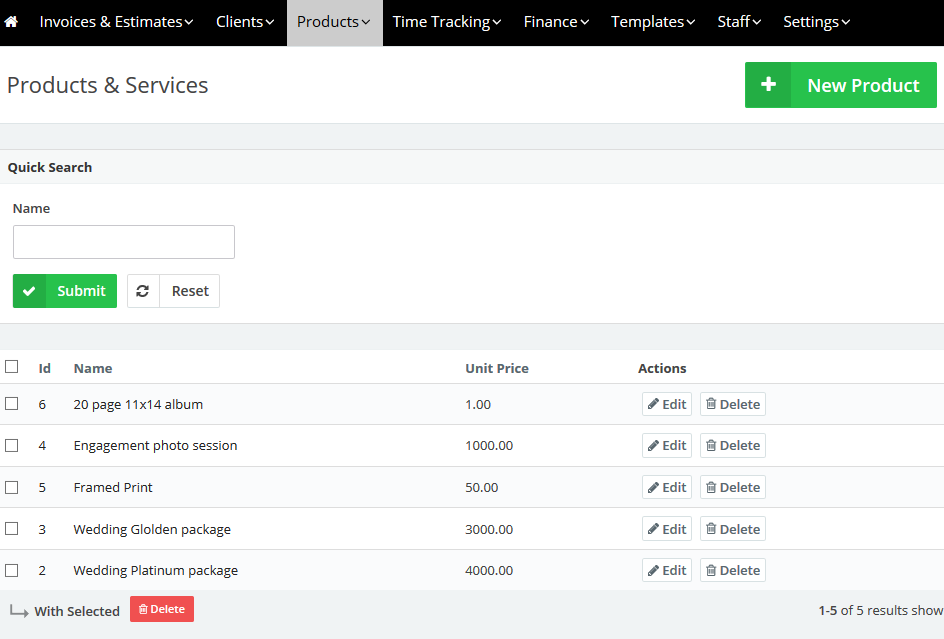
- Click on the Submit button to save the new product.
Recording the Business Expenses
OnlineInvoices also works as online expenses tracking software. To create or add new expenses to your OnlineInvoices system:
- From the “Finance” menu choose “Add Expenses“.
- Add the detail of the expense – check this link for more info Tracking Expenses in Online Invoices.
- Click “Submit” to save the new expense.
Once your Business expenses are in place, you can review and track where the money goes. You can also start sending quotes for your various services to clients.
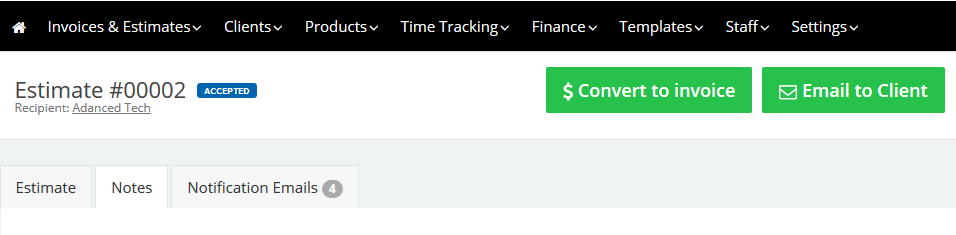
Quote your Cleaning Service and send it to your client
- From the “Invoices” menu choose “Estimates”.
- Click the “New Estimate” button.
- To get in-depth info about creating estimates visit: Creating Estimates in the Online Invoices System .
- After filling out the estimate with your service info click the “Save & Send Email” button.
- Your client will receive the estimate to his email and will have the power to accept the estimate and add notes to the estimate.
- When your client gets the estimate and accepts it you will receive an email notifying you of the update.
- When opening the quote/estimate it will be marked as accepted, click the “Convert to invoice” to generate an invoice based on this estimate.
- Once you generate the invoice you can edit it or add more fields. Check this link Create Your first invoice to get in depth knowledge of creating invoices.
- To receive payments online for your invoice you will need to set up a payment gateway check these links and configure your gateway:
Add more staff to your system
- From the “Staff” menu choose “Add Staff”.
- Add your staff details
- Name
- Email address and a password the staff member will use to login to the system.
- Set a role for your staff member
- Tick the “Active” check box.
- Click the “Save” button.
Set roles for your staff to operate the system
According to each staff member’s role in your business, you can set roles so he can use the system to add info about clients, details of work done, or invoice your clients.
To create a new role:
- From the “Staff” menu choose “Manage Staff Role“.
- The “Manage Staff Role” page lists all the available created roles.
- From the top right corner click “New Role“.
- The “New Roles” page will list all the available permissions that can be associated with the staff member as in this picture below.
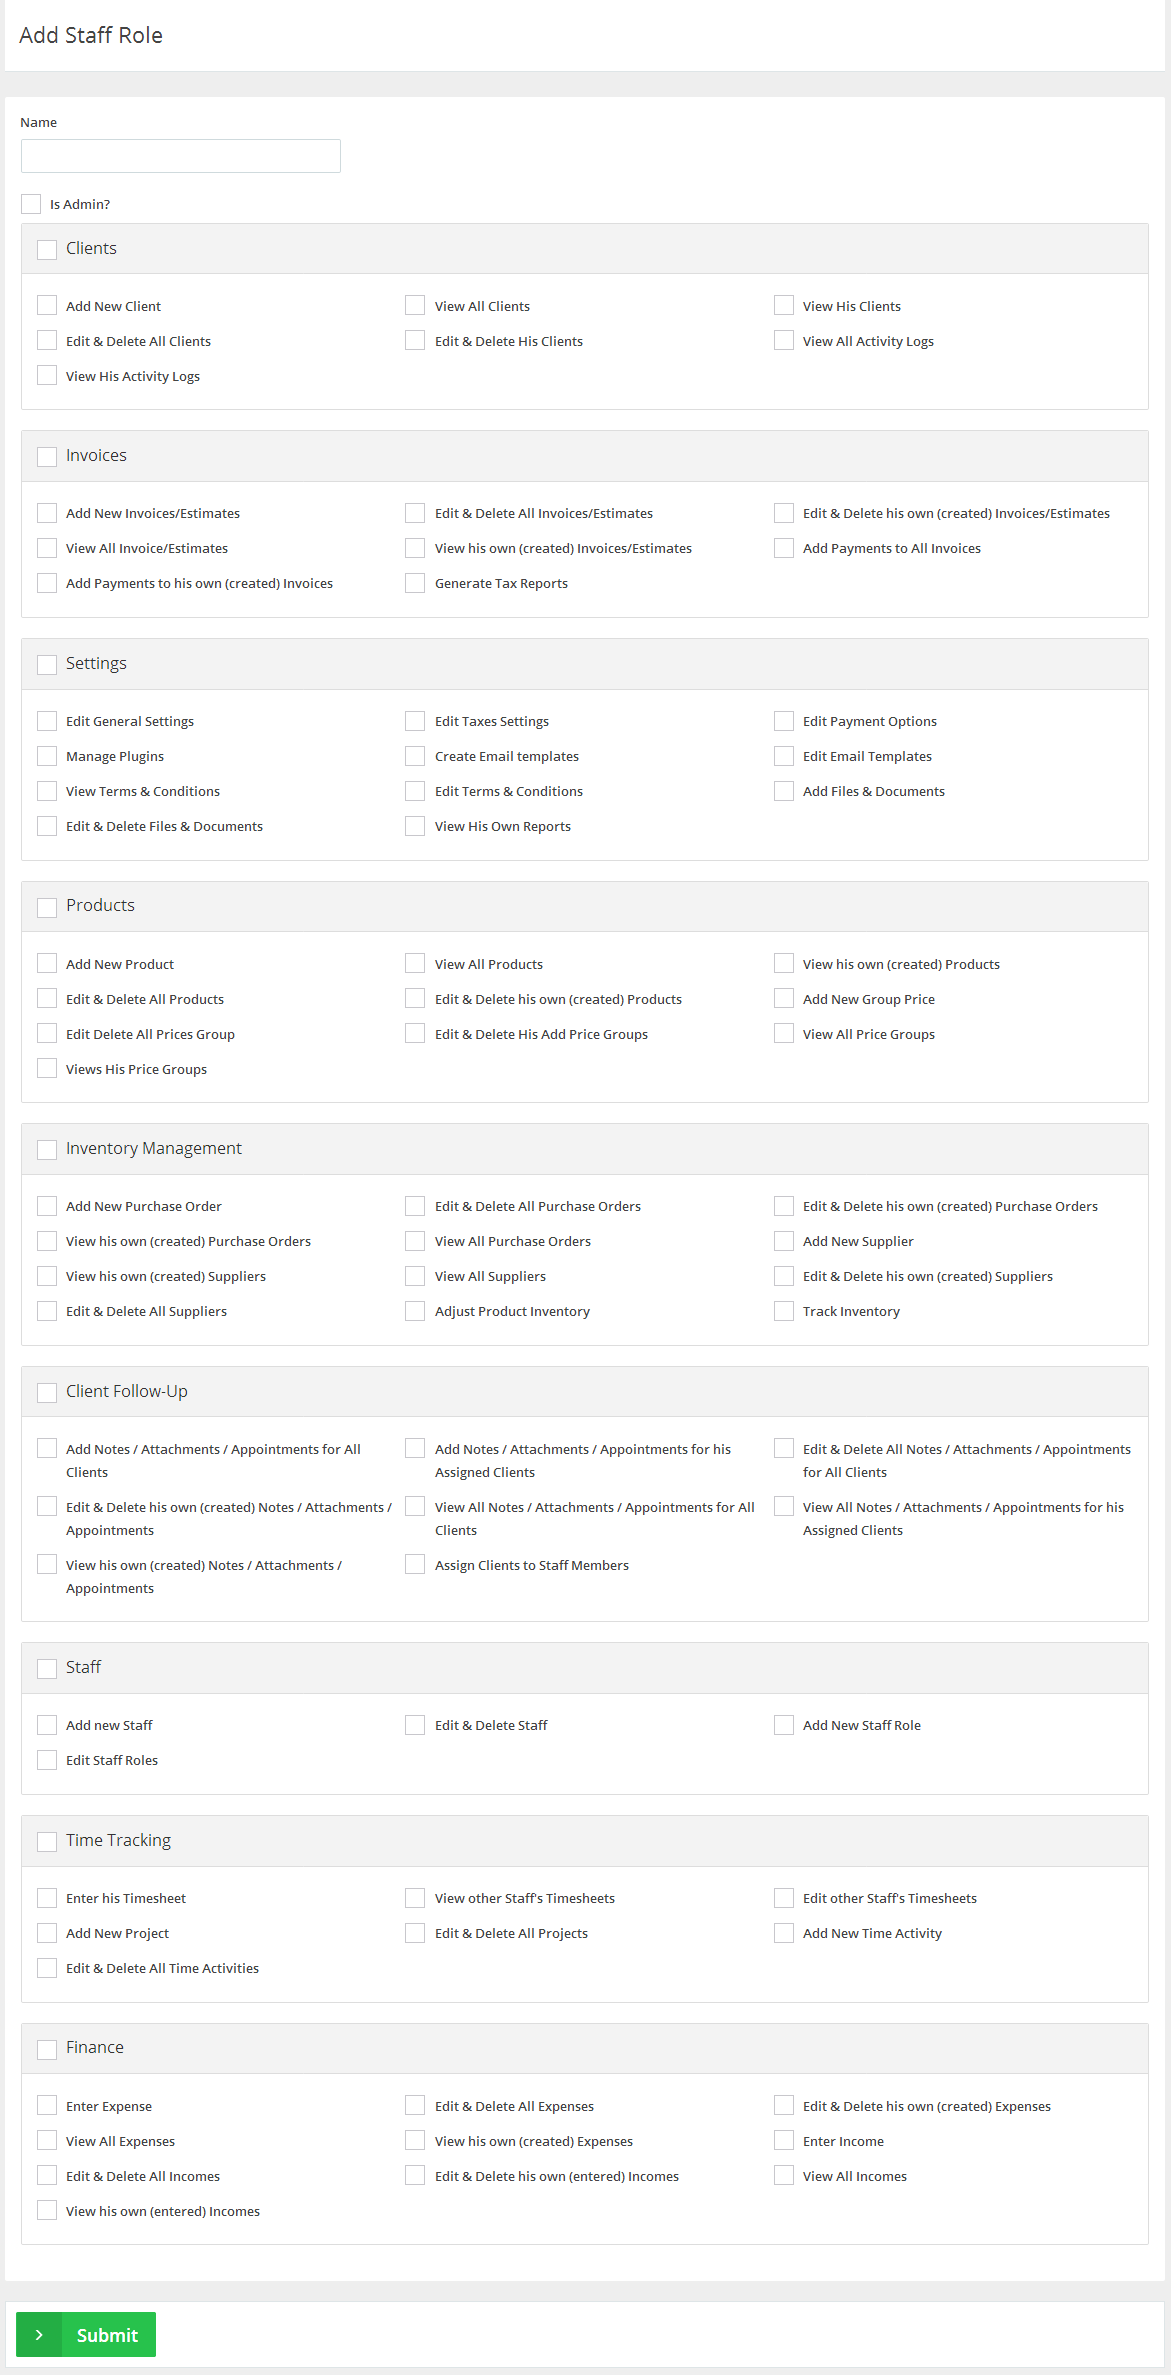
- Add a name for the role.
- Tick the “Is Admin” if you wish to give this staff member full permissions for the system.
- Start ticking the permissions that you wish to give to that role, but be careful as some roles need other roles from other sections so the staff work together smoothly. For example, before you give a person invoicing ability you should give them access to the products and clients and enable them to view invoices too.
- Click “Submit” to save the new role.
If your photography business is hourly based and you charge your clients for hours worked in the photo sessions and editing you can use the time tracking function within the OnlineInvoices system and track your hours, and your staff members’ hours too.
Track your time
Before you can start tracking your time you will need to create a project and an activity.
Start tracking your time:
- From the “Time Tracking” menu choose “Time Tracking“.
- Choose a day from the calendar.
- Click the “New Entry” button.
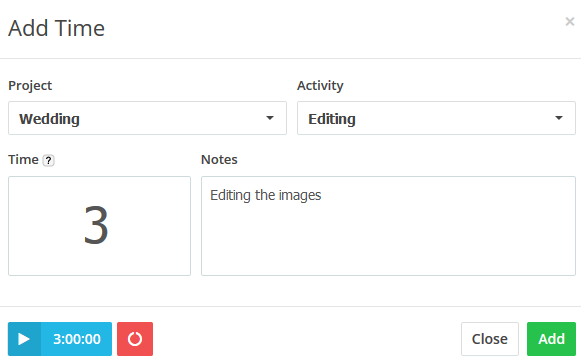
- Select a project and an activity, and add your time manually in the “Time field” or start the timer.
- Add any notes related to the task.
- Click the “Add” button.
Generate an invoice from the tracked time
To create an invoice using the time-sheet:
- From the “Time Tracking” menu choose “Generate Invoice“.
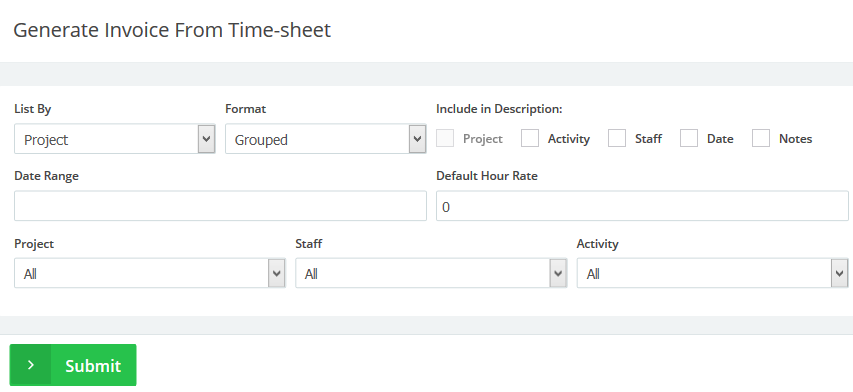
- The Settings
- List By : Choose to list by and show project, activity, staff member or Date.
- Format: Choose whether you need the items in details -every time period added in a separate row- or grouped by project, activity, staff or date range.
- Include in description : tick any check box you will need to add on the description field of the item on the invoice: Project, activity, staff or the date range.
- Choose a date range you want to invoice for. If left blank all unbilled hours for the project will be invoiced.
- Default Hourly Rate: Add the default hourly rate for the hours you will add into the invoices – the rate can be added separately for each item in the invoice.
- Project: Choose a project you want to invoice for the time worked on it.
- Staff: Choose a certain staff member to invoice for the time he/she added.
- Activity: Choose an activity you want to invoice for the time worked on it.
- Click “Submit” to generate the invoice; once you generate the invoice you can complete its data as for any normal invoice, like choosing a client or adding special fields, etc.
Creating Profit and Loss Reports
What is a Profit & Loss Report (P&L) ?
The profit and loss statement/report is a summary of the financial performance of a business over time (monthly, quarterly or annually is most common). It reflects the past performance of the business and is the report most often used by small business owners to track how their business is performing.
- Choose a Period: Monthly, Quarterly (3 months) or Yearly.
- Income: Choose to include only paid invoices in the income or all invoices.
- Date Range: Choose a date range.
- Currency: Choose a currency.
The report generated will show your income (from invoices) and your expenses in a graph and a table – the last field is the profit (or loss) for the selected time period.
Invoicing and Tax Reports
For any date range, you can generate reports related to taxes, payments or general invoice. With easy to use filter options, you can customize the results displayed by client, currency, status and many other options. See what you are up to, in seconds, any time.
General Invoice Report
- From the “Invoice” menu choose “General Invoice Report”
- Group by client, staff, invoice statues or time period.
- Choose certain client or all clients
- Invoiced by: Choose a staff member to show all his created invoices.
- Choose status: paid, partly paid, unpaid or overdue
- Choose a date range.
- Choose the currency and then click Show Report
Note: You can print the report directly or export to CSV or PDF file with graphs and tables.
Invoice Taxes Report
- From the “Invoice” menu choose “Invoice Taxes Report”.
- Choose a tax.
- Choose revenue type: Accrual or Cash
- Choose a date range.
- Choose the currency and then click Show Report
Note: You can print the report directly or export to CSV or PDF file with graphs and tables.
Invoice Payments Report
- From the “Invoice”menu choose “Invoice Payments Report”.
- Group by client or time period
- Invoiced by: Choose a staff member to show all his/her created invoices.
- Choose a specific client or all clients
- Choose a date range.
- Choose a payment method or all methods.
- Choose the currency and then click Update.
Note: You can print the report directly or export to CSV or PDF file with graphs and tables.
Start managing your accounting tasks – register for a free account on OnlineInvoices Billing and Accounting Software or if you are in a hurry use our free Photography Invoice Template.
Contact us if you have an issue or more questions.
Archives
- October 2022
- June 2022
- May 2022
- April 2022
- February 2017
- November 2016
- October 2016
- July 2016
- June 2016
- April 2016
- March 2016
- February 2016
- January 2016
- December 2015
- November 2015
- October 2015
- July 2015
- June 2015
- May 2015
- April 2015
- March 2014
- October 2013
- August 2013
- June 2013
- May 2013
- January 2013
- December 2012
