
12
2016
Retail Invoicing and Inventory Management System
The retail industry needs a simple yet advanced tools to manage their business needs. OnlineInvoices introduced new functions focusing on the needs of the retail industry and whether you run a local store or a large business OnlineInvoicies got you covered and in this tutorial we will highlight:
- Add products to your inventory.
- Manage your inventory.
- Add new suppliers.
- Manage your suppliers.
- Add and manage purchase orders.
- How to use barcodes for your business
- Accepting face-to-face credit cards payments
- Send quotes for your clients.
- Create invoices and invoice your clients for products.
- Add staff members to help you manage business.
- Create advanced reports to track how your business is going and your profit or loss over certain periods.
To manage your accounting tasks, register for a free account on OnlineInvoices Billing and Inventory Software, or if you are in a hurry, use our free retail invoice template.
Adding products to your inventory
The first step in managing your business is adding the products you are offering follow these steps to add your products.
- From the “Inventory” menu, choose “inventory”.
- Click the “New Product” button on the top right corner
Add the new Product’s details:
- Name: Enter the product name.
- Description: Add a description for the product.
- If you want to use only one field for describing your item, leave this field empty for all items and it will not be shown on the invoice.
- Retail Price: Enter the price WITHOUT the currency symbol.
- Tax 1 & 2: Choose a default tax to add to the product.
- You can add one or two taxes (or no tax).
- Supplier: Choose a supplier from the list.
- Buy Price: Enter the price you paid for the supplier to buy this item.
- Product code: Add a unique product code.
- Barcode: You can use a barcode reader to input the unique barcodes for each product.
- Brand: Add the product Brand if applicable, e.g., Nike.
- Category: Add a category that suit the product, e.g., Sports Shoes.
- Tags: Add any tag that may suit your product, e.g., Sports – shoes – Men – Red …etc.
- Internal Notes: Add any notes related to this product to view later.
- Check the “Track Stock” check box to let the system track the number of products and update it automatically with every operation done with it (sale – purchase).
- In the “Initial Stock Level”, enter the current quantity of items in stock.
- In the “Low Stock Threshold”, you will get a low stock notification when product quantity is equal or under this number.
- Tick the “Temporarily Deactivate” check box to temporarily deactivate this product.
- Click on the “Save” button to save the new product.
You can create each product using these steps or import a list of products from a CSV file if you have a large inventory.
Manage The Inventory
Many actions can by applied on added products so if you need to edit, delete or view informations about an added products follow these steps
- From the “Inventory” menu, choose “inventory”.
- This page lists all inventory products or services you have added to your system.
- To create a new product, click the “New Product” button.
- Use the search bar to search for products by name, code, tag, category, brand, or status.
- Each listed inventory item will show its name, code, barcode, status (IN STOCK – INACTIVE – LOW STOCK – OUT OF STOCK), buy price, and retail price.
Edit an Inventory product
- From the “Inventory” menu, choose “Inventory”.
- Next to the product you wish to edit, click the right arrow and choose “Edit”.
Delete an inventory product
- From the “Inventory” menu, choose “Inventory”.
- Next to the product you wish to delete, click the right arrow and choose “Delete”.
View an inventory product’s information
The information tab will show the product details and how many were sold from this item.
- From the “Inventory” menu, choose “Inventory”.
- Next to the product you wish to view, click the right arrow and choose “view”.
- Click the “information” tab.
Edit a Stock level (quantity) a certain product
Once you have created a product and added the Initial Stock levels, the quantity of products changes automatically with new sales orders or purchases orders. To adjust a certain product’s quantity:
- From the “Inventory” menu, choose “Inventory”.
- Next to the product you wish to view, click the right arrow and choose “view”.
- Click the information tab.
- Click on the “Adjust Manually” button under the stock level option.
- From the “Quantity” option, choose to add or subtract and add the number you wish to add/subtract to the stock level.
- Add the “Unit Price” of the buy/sell addition and choose the currency.
- Choose the “Movement date”.
- Add any related notes.
- The Stock Before and Stock After will show the changes to the quantity of the stock before and after this edit.
- Click the “Save” button.
Review the latest stock Transactions
All Stock Transactions are recorded within your system. To view the latest stock Transactions:
- From the “Inventory” menu, choose “Inventory”.
- Next to the product you wish to view, click the right arrow and choose “view”.
- Click the “Stock Transactions” tab.
The Stock transaction tab will show all the latest edits to the stock level (Purchase orders – Sales orders – Manual Adjustments), date of the edit, move count, and stock level.
Review the Timeline of a certain stock.
- From the “Inventory” menu, choose “Inventory”.
- Next to the product you wish to view, click the right arrow and choose “view”.
- Click the “Timeline” tab.
The Timeline tab will show all the latest actions to the stock level (Purchase orders – Sales orders – Manual Adjustments – Delete), date of the action, stock level after the action, and which staff member performed this action.
Adding New Suppliers
Once you have finished adding products its time to add your suppliers. You can issue purchase orders with the products you need to certain suppliers and track the order’s state from leaving the supplier’ storage to arriving to you inventory.
To add new suppliers to your OnlineInvoices Inventory Management system, follow these steps:
- From the “inventory” menu, choose “Manage Suppliers”.
- The “Suppliers” home page will list all the recently created suppliers.
- Click the “New Supplier” button.
Add the new supplier’s details
Complete the “Supplier Details”:
- Business Name: Enter the supplier business name here. If there is no organization name, simply add the supplier’s full name, and leave “First Name” and “Last Name” empty.
- Add your supplier’s Business details: Name, Telephones, and Address.
- Tick the “Add Secondary address” check box if you wish to add another address for the supplier, like another office or the suppliers’ warehouse.
- Click the “Add Contact” button to add more contacts related to the supplier, like sales department, shipping department…etc. You can add unlimited contacts for one supplier.
Complete the “Account Details”:
- Supplier Number: By default, your system will automatically generate the next available Supplier number. You can change the number if required (providing you select a number not already taken), and the system will select the next available number when you add your next Supplier.
- Currency: If you require a different currency for a Supplier (different from the default currency entered in the global settings), enter the required currency here.
- Email: Enter your supplier’s email address here.
- Notes: Add any notes you wish to add about the supplier.
- Generate Password Automatically: If you select this option, a new password will be generated by the system and emailed to the Supplier.
- Send online login details to Supplier: A new Supplier password (and link to the site) will be emailed to the Supplier’s email address.
Click on the “Save” button to save the new Supplier.
Manage added suppliers
- From the “Inventory” menu, choose “Manage Suppliers”.
- This page lists all current suppliers. You can use the icons on the right to edit, view, or delete the supplier details.
- Add new Suppliers to your OnlineInvoices Inventory system by clicking the “New Supplier” button.
- Use the “Quick Search” tab to search for a supplier; click the “More Options” button to show all search filters.
- The Suppliers table shows all your suppliers with their business and full names, country, status, plus various “Actions” you can implement for any specific supplier.
- Use the select boxes to select multiple suppliers (if required) to bulk delete them.
View your supplier’s details.
- From the “Inventory” menu, choose “Manage Suppliers”.
- From “Manage Suppliers”, choose “View”, next to the supplier you need to view.
- The supplier’s view page will show two tabs:
- The “profile” tab shows the supplier’s basic details and his contacts.
- The “Latest Purchase orders” tab shows a list of the latest purchase orders for those suppliers, showing the order ID, Date, its status (Received – Unreceived), the total amount of the order and action buttons for the order.
- View order.
- Save the order as PDF.
- Send the order to the supplier’s email.
- The supplier view page also shows buttons to edit the details for the supplier or delete it.
Edit your supplier’s details.
- From the “Inventory” menu, choose “Manage Suppliers”.
- From “Manage Suppliers”, click “Edit”, next to the supplier you need to edit details.
Delete your supplier.
- From the “Inventory” menu, choose “Manage Suppliers”.
- From “Manage Suppliers”, click “Delete”, next to the supplier you need to delete.
- This is a permanent action. Deleted suppliers and their data can’t be recovered.
Create Purchase Orders
- From the “Inventory” menu, choose “Manage Purchase Orders”.
- Click the “New Purchase Order” button.
Anatomy of a purchase order:
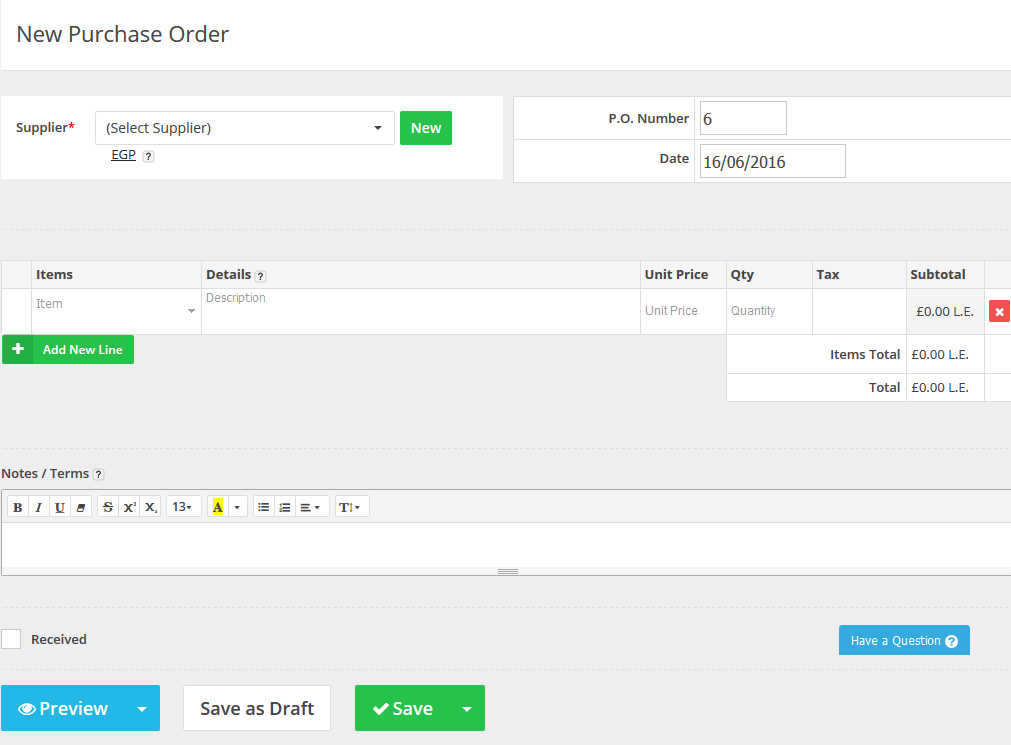
- Select a supplier from the previously created suppliers.
- Add the P.O. Number and the Purchase order’s date.
- Choose an Item from the drop down list and fill its data (unit buy price – quantity).
- Add any notes or terms related to your purchase order.
- Tick the “Received” check box if you have already received this order.
- After finishing the purchase order, you can:
- Preview the order in web or as PDF,
- Save as Draft,
- Save and Send Via Email to supplier or Save and print the order.
Manage Created Purchase Orders
From the “Inventory” menu, choose “Manage Purchase Orders”.
- The Purchase Orders page lists all Purchase Orders you have created.
- To create a new Purchase Order, click the “New Purchase Orders” button.
- Use the search bar to search for Purchase Orders by number, supplier, currency, date, or staff.
Each listed Purchase Order will show its number, supplier information, date, status (DRAFT – UNRECEIVED – RECEIVED), and price.
Edit a Purchase Order
- From the “Inventory” menu, choose “Manage Purchase Orders”.
- Next to the Purchase Order you wish to edit, click the right arrow and choose “Edit”.
Delete a Purchase Order
- From the “Inventory” menu, choose “Manage Purchase Orders”.
- Next to the Purchase Order you wish to delete, click the right arrow and choose “Delete”.
Save a Purchase Order as a PDF file
- From the “Inventory” menu, choose “Manage Purchase Orders”.
- Next to the Purchase Order you wish to download as PDF, click the right arrow and choose “PDF”.
- The PDF file will start downloading automatically.
Print a Purchase Order
- From the “Inventory” menu, choose “Manage Purchase Orders”.
- Next to the Purchase Order you wish to print, click the right arrow and choose “print”.
Email a Purchase Order to the supplier
- From the “Inventory” menu, choose “Manage Purchase Orders”.
- Next to the Purchase Order you wish to email, click the right arrow and choose “Email to supplier”.
- Edit the email body and information then click “Send”.
Clone a Purchase Order
- From the “Inventory” menu, choose “Manage Purchase Orders”.
- Next to the Purchase Order you wish to clone, click the right arrow and choose “Clone”.
- The Purchase order will be cloned and opened in a new window to complete its data.
View a Purchase Order information
- From the “Inventory” menu, choose “Manage Purchase Orders”.
- Next to the Purchase Order you wish to view, click the right arrow and choose “view”.
- Click the “Purchase Order” tab.
The Purchase Order tab will show the Purchase Order details and actions to apply (Edit -Email – Print – PDF – Delete) and mark as received.
Mark a Purchase Order as Received
- From the “Inventory” menu, choose “Manage Purchase Orders”.
- Next to the Purchase Order you wish to view, click the right arrow and choose “view”.
- Click the “Purchase Order” tab.
- From the top right corner, click the “Mark as Received” button.
Mark a Purchase Order as Unreceived
- From the “Inventory” menu, choose “Manage Purchase Orders”.
- Next to the Purchase Order you wish to view, click the right arrow and choose “view”.
- Click the “Purchase Order” tab.
- From the top right corner, click the red arrow and choose “Mark as Unreceived” button.
View the Activity Log for a purchase order.
All actions done on a certain purchase order are recorded within your system. To view the latest activities:
- From the “Inventory” menu, choose “Manage Purchase Orders”.
- Next to the Purchase Order you wish to view, click the right arrow and choose “view”.
- Click the “Activity Log” tab.
The Activity Log tab will show all the latest actions to the purchase orders and which staff members performed this action.
View the Sent Emails for a purchase order.
- From the “Inventory” menu, choose “Manage Purchase Orders”.
- Next to the Purchase Order you wish to view, click the right arrow and choose “view”.
- Click the “Notification Emails” tab.
Change the Purchase Order Settings
To change the next P.O Number or the address settings:
- From the “Inventory” menu, choose “Manage Purchase Orders”.
- In the top right corner, click on the gear icon.
- In the “Next P.O. Number” area, add the number you wish the system to start counting from.
- From “Shipping & Billing information” drop down menu, choose whether you want the system to use your default address or add a custom address.
Using Barcode to manage your products.
To use the barcode in adding and retrieving products follow these steps.
First when adding a new product details put the mouse pointer on the barcode field then scan the product with the barcode reader and the item’s barcode will appear as in the following picture.

Second when requesting a purchase order add put the mouse pointer on the item filed, scan the product with the barcode reader and the product details will appear.

Third when invoicing a client put the mouse pointer on the item filed, scan the product with the barcode reader and the product details will appear.

Accepting Face-to-Face Credit Card Payments
By using Stripe with OnlineInvoices you will able to receive credit card payments for remote online and face-to-face clients and receive the money into your bank account.
The Stripe payment gateway is available for businesses in 24 countries, enabling you to accept payments from anywhere in the world.
These are the 24 countries: Australia, Canada, Denmark, Finland, Ireland, Norway, Sweden, United Kingdom, United States, Austria, Belgium, France, Germany, Italy, Japan, Luxembourg, Netherlands, Spain, Brazil, Mexico, New Zealand, Portugal, Singapore and Switzerland.
To get started with Stripe you will first need to set up a free account.
Click here to create your Stripe account.
In order to receive the funds from your charges, you’ll need to associate a bank account to your Stripe account and start receiving transfers. You can update your bank account information at any time, and you can also customize how frequently transfers are made.
Click here to set up your bank account for transfers.
Integrate Stripe with your OnlineInvoices account
To accept online payments for your invoices using Stripe, follow these steps:
- Log into your Online Invoices account, or Register for a free account.
- From the “Settings” menu choose “Payment Options“.
- Choose “Stripe“, mark as “Active“, and “Default” if you want to make it the primary payment method, then add your personal “Live Secret Key” and “Live Publishable Key“as in the picture below:

To get your keys from Stripe:
- Log in to your Stripe account.
- Click “Account” in the top-right-hand corner of the page.
- Click “Account Settings“.
- Click “API Keys” from the top tab.
- Here you will find the “Live Secret Key” and “Live Publishable Key“. You can also use the test keys in the test mode to test the payments before you activate your Stripe account.
- Click the “Done” button to save the changes.
How to get paid for your invoices by credit cards on OnlineInvoices:
Credit card online payment:
After integrating Stripe with your OnlineInvoices account and activating it (previous step), send your invoices to your clients by email and they will be able to pay these invoices using their credit card online.
How a client can pay an invoice through Stripe:
- After you receive the invoice, click the “pay” link and you will be directed to the following screen below:
- The client will need to fill in their personal details, and select “Stripe” from “Payment Method” if it is not selected.
- They should then enter their credit card details and click “Pay Invoice“.
- Once the payment is accepted the money will go your Stripe account where you can withdraw to your linked bank; your invoice will be marked as “Paid“, and you will be notified by email.
Face-to-face payments:
- You will first need to create and save the invoice before adding face-to-face payment.
- Too add a face-to-face payment by credit card using Stripe follow these steps:
- Create your invoice from “Invoices” -> “Add New Invoice“
- Fill in the invoice, and do NOT tick the box “Already Paid“
- Click on the proper “Save” button, and it will send you to the invoice page.
- Click on the “Add Payment” button.
- In the payment form select “Stripe” from the “Method” drop-down menu and fill in the rest of the data.
- Fill in your client’s credit card details, then click the “Add Payment” button.
- Once the payment has given the Success message, you will get the payment on your Stripe account, where you can withdraw it to your bank at any time.
Send Quotes to customers
Create a new estimate in the Online Invoices system:
- From the “Sales” menu choose “Estimates”.
- Click the “New Estimate” button.
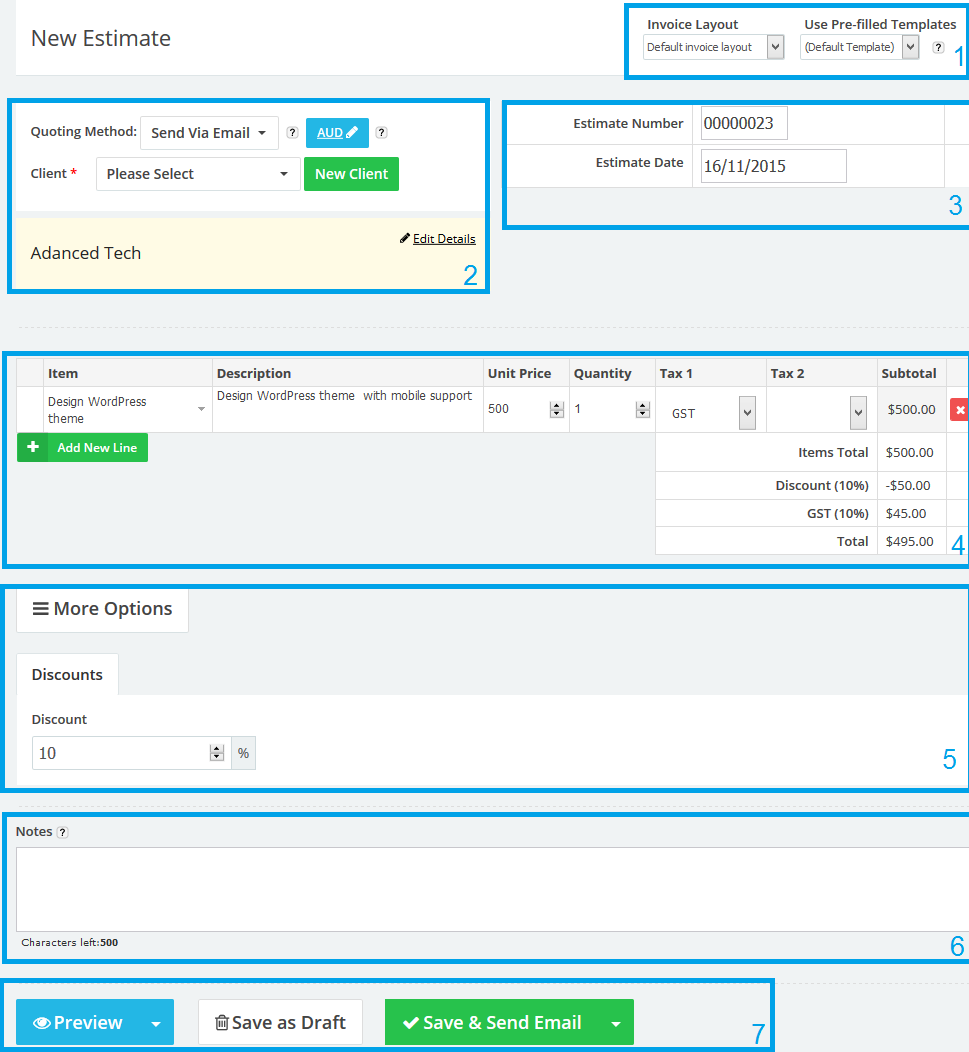
Anatomy of an estimate
- &
- Use a pre-filled estimate/invoice template: Select a pre-filled estimate/invoice from your saved “pre-filled invoice templates” to make creating a new estimate for similar products or services quick and easy. Edit the estimate as required – client, discount, etc and then save as a new invoice.
- Choose an Estimate/Invoice layout from you saved “Invoice Layout Templates“.
- Choose Invoicing method, currency and client.
- Invoicing method: If you selected “Send Via email,” you will have to enter the client’s email address. You will able to set the client’s online login details and set automatic email reminders to be sent for unpaid invoices. Additionally the client can pay the invoice online and approve your terms & conditions.
- Currency: If you wish to use a different currency for this invoice, click the link next to this help icon. Your selection will override your default currency setting.
- Client: Select the client who will be invoiced or create a new client. The client’s data will appear highlighted in yellow where it can reviewed and edited.
- Edit the estimate number and dates.
- Add your product/service details.
- Name: Enter the product/service name or choose a per-created product.
- Details: If you want to use only one field for describing your item, leave this field empty for all items and it will not be shown in the invoice
- Unit price: Enter the price for the product/service.
- Qty: Enter the product quantities.
- Tax1, Tax2: Add one or more taxes. If the tax field is left blank it will not appear in the invoice.
- Add new line: Add a new space for another product or service
- You can add special fields:
- Notes: The text entered here is in addition to the product or service descriptions in the main body of the estimate . This allows you to add further details, perhaps relating to delivery, other payment details, or messages relating to special offers.
- After finishing the estimate:
- Preview the estimate in Web view or in PDF format
- Save the invoice as a draft
- Save and send the estimate to the client’s email.
- Save and Print the estimate if you choose the “Print offline” invoicing method.
Create New Invoices
From the “Sales” menu choose “Create Invoice”.
Anatomy of an invoice
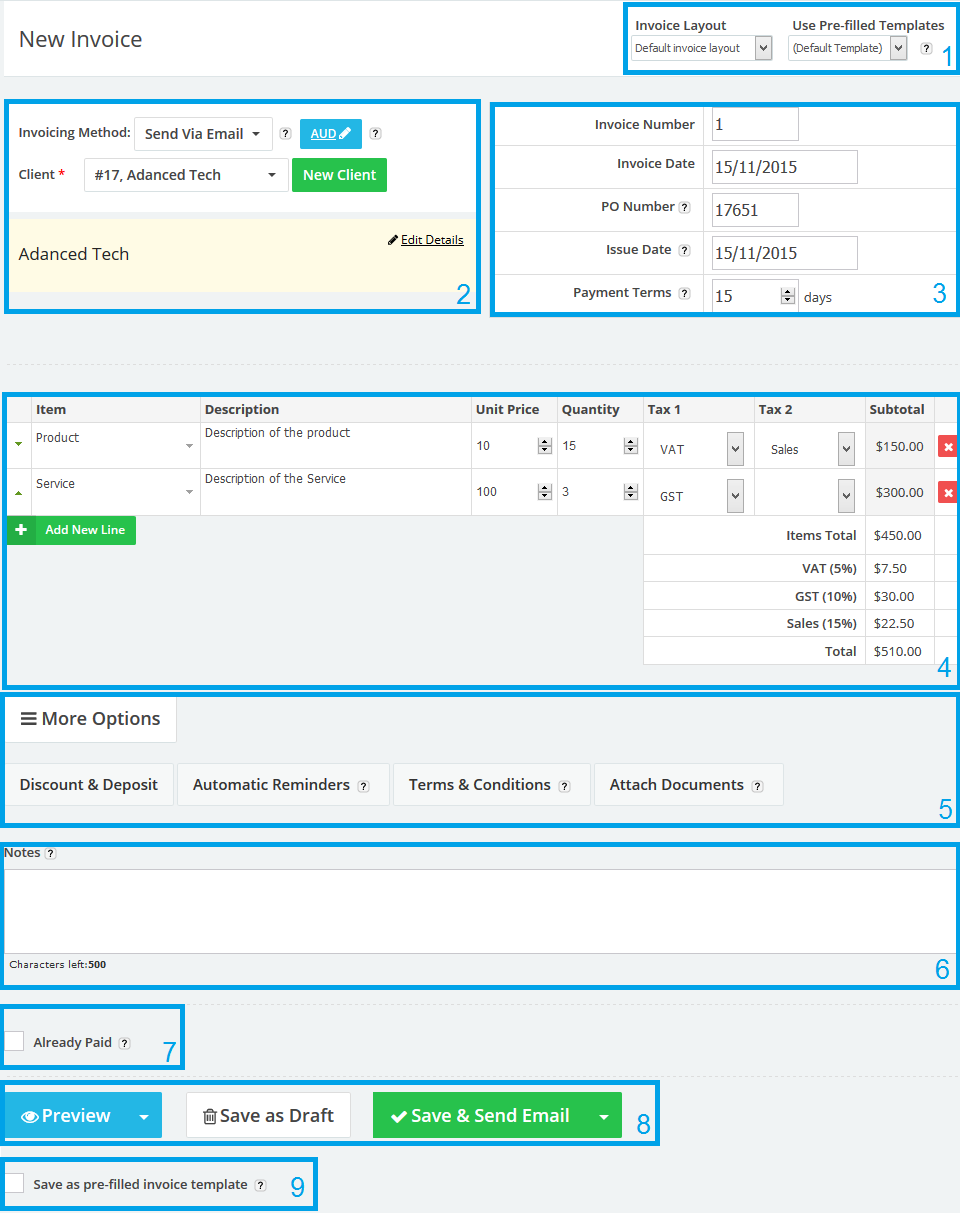
- If you have created pre-filled invoice templates or invoice layout you can choose to apply them from this option:
- Select a pre-filled invoice from your saved “Pre-filled Invoice Templates“, once you choose an option from the drop down menu, it applies directly to the invoice. Pre-filled invoice templates can save you lots of time if you are invoicing the same products often. (Learn How to Create pre-filled invoice template).
- Select an invoice layout from your saved” Invoice Layout” templates once you choose an option from the drop down menu, it applies directly to the invoice. invoice layout templates is used to customize the look and adding custom fields of the invoice e.g. translate the invoice into your local language (Learn How to Create invoice layout template).
- Choose Invoicing method, currency and client.
- Invoicing Method: if you selected “Send Via email,” you will have to enter the client email address. You will able to set client online login details and set automatic email reminders to be sent for unpaid invoices. Additionally the client can pay the invoice online and approve your terms & conditions. If you prefer to print your invoice offline you can choose (Print (offline)) from the invoicing method, you will not be asked to add a client’s email address and you will be responsible for updating the invoice’s status and keep track of the payments.
- Currency: If you wish to use a different currency for this invoice, click the link next to this help icon. Your selection will override your default currency setting.
- Client: Select the client who will be invoiced or create a new client, the client’s data will appear highlighted in yellow where it can reviewed and edited.
- Edit the invoice number, dates, and add payment terms.
- If the issue date is not the same as the day on which you are creating the invoice, enter the issue date here. This is useful where you wish to create an invoice now and send it on a specific date in the future.
- Payment terms: Enter the number of days after which the invoice is due (for example you would enter 14 where the invoice is due 14 days from the issue date).
- Add your Products/Services details.
- Name: Enter the product/service name or choose a per-created product.
- Details: if you want to use only one field for describing your item, leave this field empty for all items and it will not be shown in the invoice
- Unit price: Enter the price for product/service
- Qty: Enter the product Quantities.
- Tax1, Tax2: Add one or more taxes. If the tax field is left blank it will not appear in the invoice.
- Add new line: Add new space for another product or service
- You can add special fields:
- Notes: The text entered here is additional to the product or service descriptions in the main body of the invoice. This allows you to add further details, perhaps relating to delivery, other payment details, or messages relating to special offers.
- Already Paid: Choose this option to mark the invoice as paid e.g. if you are invoicing offline.
you will be prompted for payment method and Ref No.
- After finishing the invoice:

- Preview the invoice in Web view or in PDF format
- Save the invoice as Draft
- If you chose “Send Via Email” from the “Invoicing Method” section you will be able to send the invoice to you client’s email be clicking the “Save & Send Email” button.
- To Save the invoice but without sending an email click the “Save as Draft” button or the “Save & Don’t Send Email” button.
- If you wish to edit the subject or the body of the email before sending it to your client or add more more emails to receive the invoice click the “Send with Revised Email” button and you will be directed to a page where you will able to est the subject of the email, the body of the email and add more emails as “CC” or “BCC“.
- If you chose “Print (offline)” from the “Invoicing Method” section you will be able to Save the invoice and print to to invoice your client.
- If the same invoice is being used for many clients, it can be saved as a pre-filled template. This saves creating it again. Check #1 for more info.
Add new Staff members
Adding team members makes work easier, and a staff member can act as an employee to your company.
A new staff member can:
- Create and manage products or services.
- Create and manage clients.
- Log expenses
- Create projects and Activities and track time.
- Create invoice and estimates and invoice the clients.
- You can set permissions for your staff member for any function in the system and track them.
To Add a New Staff Member :
- From the “Staff” menu choose “Add Staff“.
- Add your staff member’s details
- Name
- Email address and a password the staff will use to login to the system.
- Set a role for your staff.
- Tick the “Active” check box.
- Click the “Save” button.
Creating Profit and loss Reports
What is a Profit & Loss Report (P&L) ?
The profit and loss statement/report is a summary of the financial performance of a business over time (monthly, quarterly or annually is most common). It reflects the past performance of the business and is the report most often used by small business owners to track how their business is performing.
- Choose a Period: Monthly, Quarterly (3 months) or Yearly.
- Income: Choose to include only paid invoices in the income or all invoices.
- Date Range: Choose a date range.
- Currency: Choose a currency.
The report generated will show your income (from invoices) and your expenses in a graph and a table – the last field is the profit (or loss) for the selected time period.
Invoicing and Tax Reports
For any date range, you can generate reports related to taxes, payments or general invoice. With easy to use filter options, you can customize the results displayed by client, currency, status and many other options. See what you are up to, in seconds, any time.
General Invoice Report
-
Click the “Reports” menu.
-
Choose “Invoices reports“.
-
Group by client, staff, invoice statues or time period.
- Choose a certain client or all clients
- Invoiced by: Choose a staff member to show all his created invoices.
- Choose status: paid, partly paid, unpaid or overdue
- Choose a date range.
- Choose the currency and then click Show Report
Note: You can print the report directly or export to CSV or PDF file with graphs and tables.
Invoice Taxes Report
-
Click the “Reports” menu.
-
Choose “Accounting Reports“.
-
Click the “Tax Report“
-
Choose a tax.
- Choose revenue type: Accrual or Cash
- Choose a date range.
- Choose the currency and then click Show Report
Note: You can print the report directly or export to CSV or PDF file with graphs and tables.
Invoice Payments Report
-
Click the “Reports” menu.
-
Choose “Invoices Report“.
-
Group by client or time period
- Invoiced by: Choose a staff member to show all his created invoices.
- Choose a specific client or all clients
- Choose a date range.
- Choose a payment method or all methods.
- Choose the currency and then click Update.
Note: You can print the report directly or export to CSV or PDF file with graphs and tables.
Start managing your accounting tasks. Simply register for a free account on OnlineInvoices Accounting and inventory Software or if you are in a hurry use our free retail invoice template.
Contact us if you have an issue or more questions.
Archives
- October 2022
- June 2022
- May 2022
- April 2022
- February 2017
- November 2016
- October 2016
- July 2016
- June 2016
- April 2016
- March 2016
- February 2016
- January 2016
- December 2015
- November 2015
- October 2015
- July 2015
- June 2015
- May 2015
- April 2015
- March 2014
- October 2013
- August 2013
- June 2013
- May 2013
- January 2013
- December 2012
