
Jun
19
2016
19
2016
Adding New suppliers to your OnlineInvoices Inventory Management System
“Adding New Suppliers” on your “Online Invoices” Inventory Management system can be done through the following steps:
- Through the “Inventory” tab, select the “Manage Suppliers” option.
- The “Suppliers” main home page will display all the recently created suppliers.
- Click the “New Supplier” button.
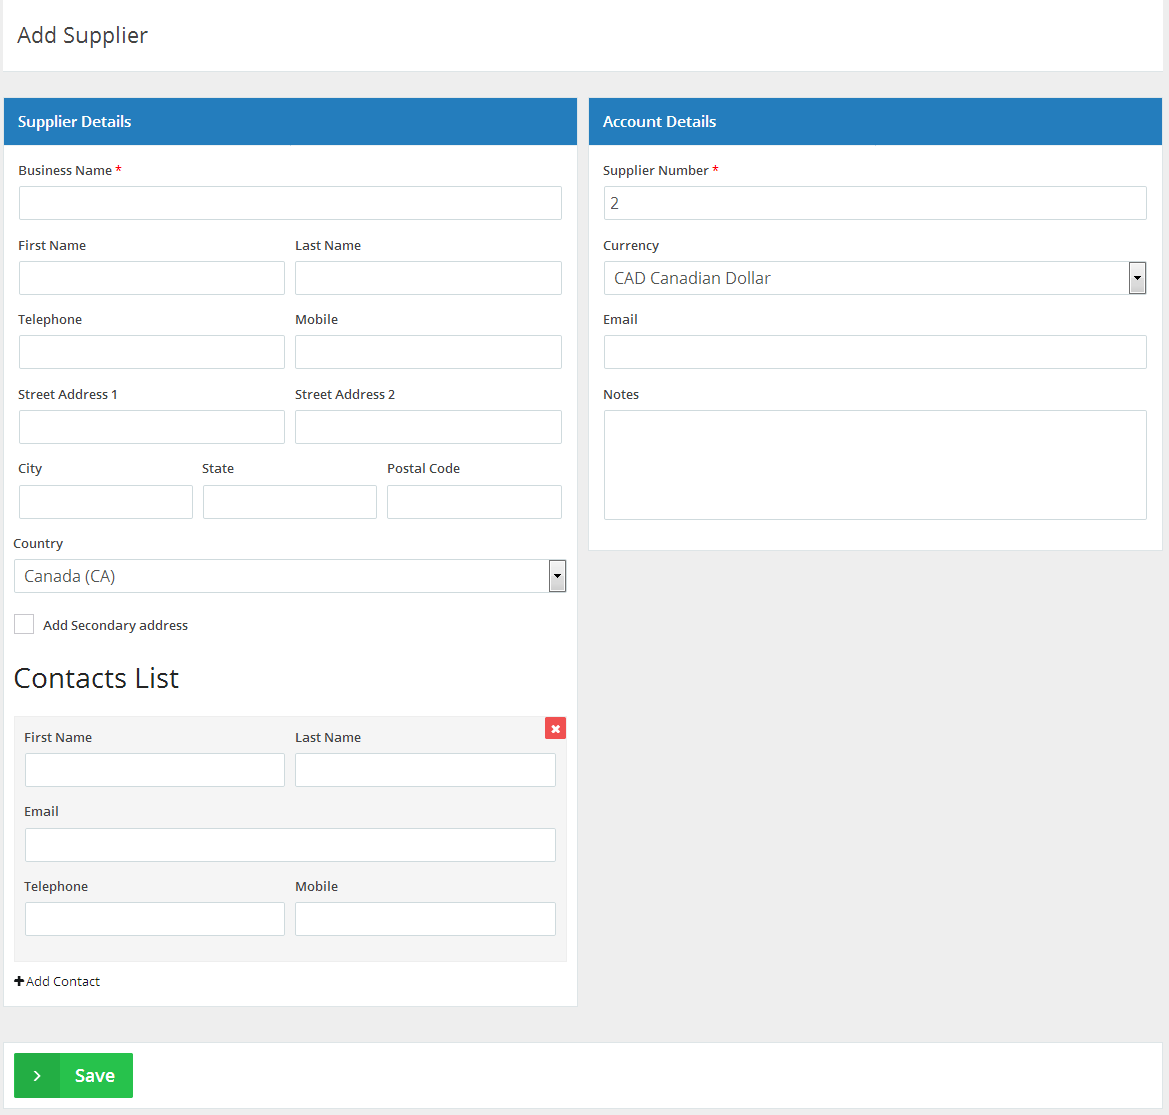
Add the new supplier’s details:
Complete the “Supplier Details”:
- “Business Name”: Enter the supplier business name here. If there isn’t any organization name, simply add the supplier’s full name, and leave “First Name” and “Last Name” blank(empty).
- Add your supplier’s Business details: “Name”, “Telephones”, and “Address”.
- Tick the “Add Secondary address” checkbox if you wish to add another address for the supplier, such as another office or the suppliers’ warehouse for example.
- Click the “Add Contact” button to add more contacts related to the supplier, like sales department, shipping department…etc. You can add unlimited contacts for one supplier.
Complete the “Account Details”:
- “Supplier Number”: By default, your system will automatically generate the next available Supplier number. You can change the number if required (providing you with an option to select a number which has not been taken already), and the system will select the next available number when you add your next Supplier.
- “Currency”: If you required dealing with a different currency with a Supplier (rather than the default currency entered into the global settings), enter the appropriate currency into the currency field.
- “Email”: Enter your supplier’s “Email” into the email address field.
- “Notes”: Add any notes you want to add about the supplier.
Click on the “Save” button to save the new Supplier.
Archives
- October 2022
- June 2022
- May 2022
- April 2022
- February 2017
- November 2016
- October 2016
- July 2016
- June 2016
- April 2016
- March 2016
- February 2016
- January 2016
- December 2015
- November 2015
- October 2015
- July 2015
- June 2015
- May 2015
- April 2015
- March 2014
- October 2013
- August 2013
- June 2013
- May 2013
- January 2013
- December 2012
