
Jun
21
2015
21
2015
Creating Recurring Invoices on the Online Invoices System
Create a new recurring Invoice:
- Through the “Invoice & Estimates” tab, Select “Recurring Invoices”. If you have activated the “Inventory management and control software” via the “Plug-in Manager” section, then the “Invoice & Estimates” tab will be showing as “Sales”.
- Click the “New Subscription” button.
Anatomy of a recurring invoice
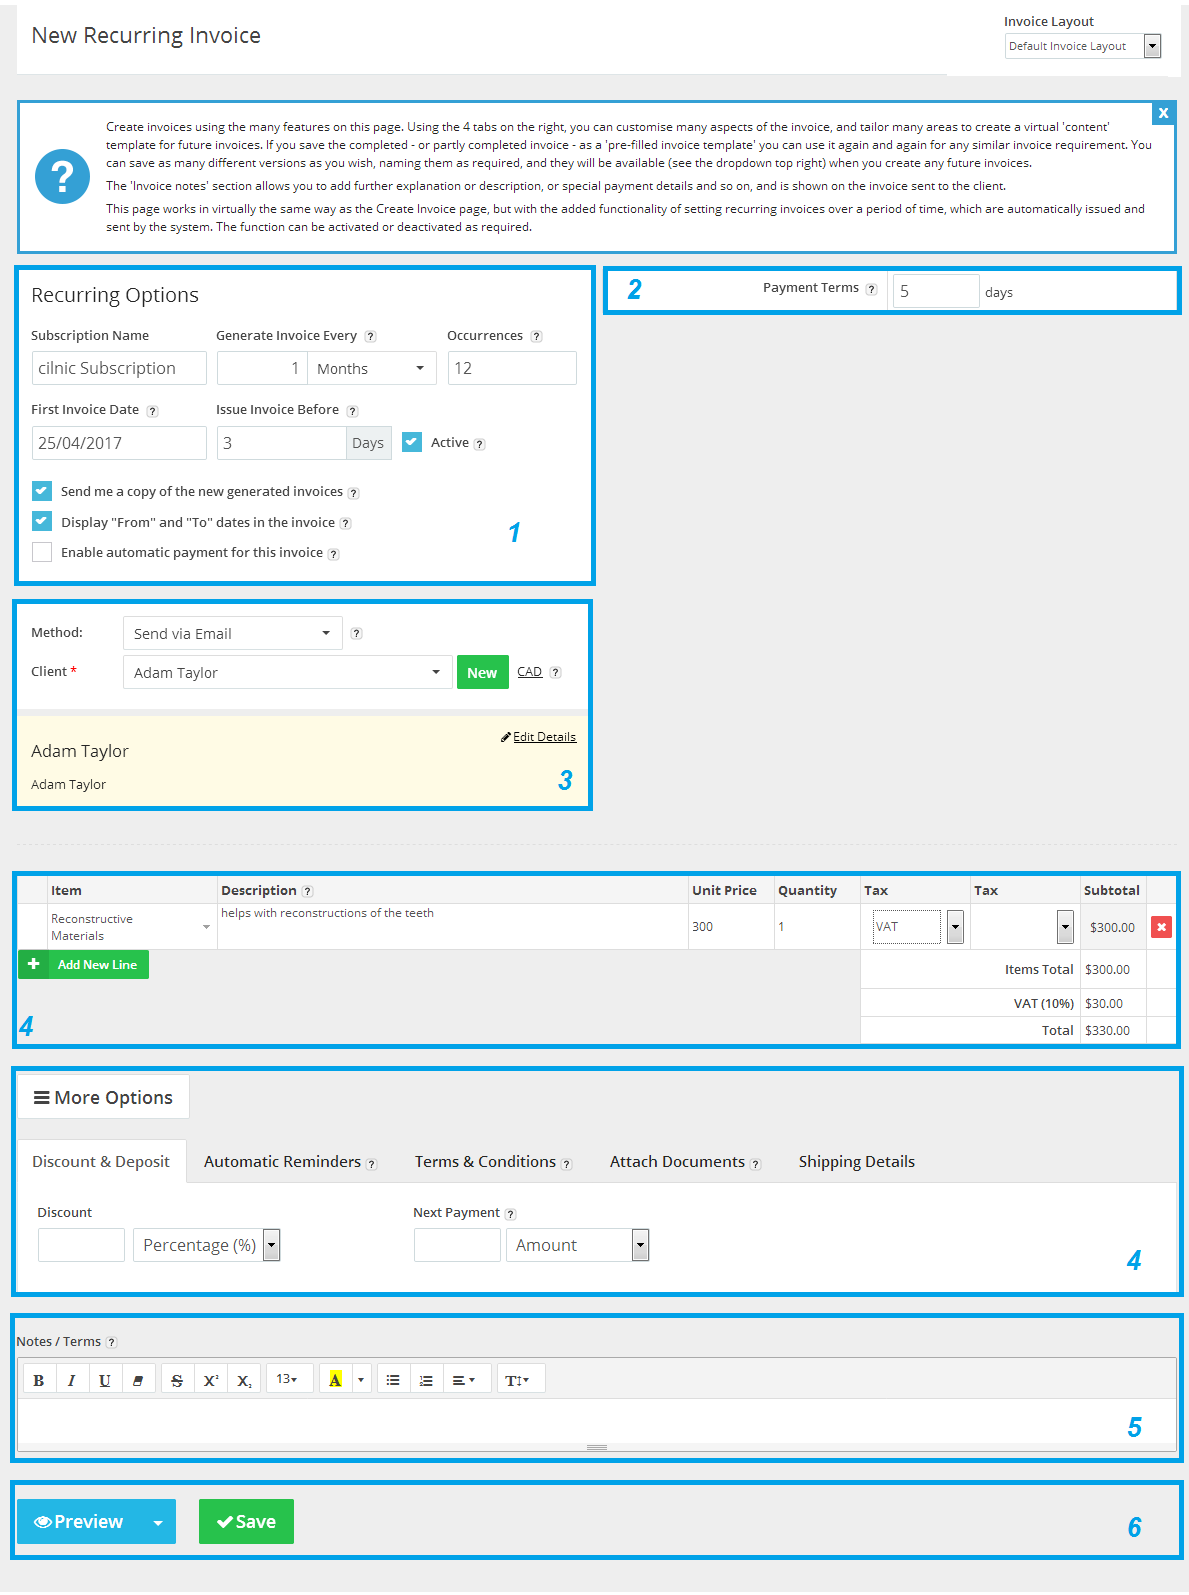
- Set “Recurring Options”.
- Subscription name: Specify the name of the recurring invoice. All generated invoices will be listed under this name.
- “Select Invoice Generation Period”: Enter the duration of time the subscription is for (for example select month where the invoice will be issued on monthly basis). You can select whether if it’s daily, weekly, monthly, Quarterly, Semi-Annual or even Annually.
- “First invoice date”: Enter the date of the first invoice’s subscription renewal – it will automatically be sent on this date with an adjusted precise date and subscription period, and thereafter at the same time intervals.
- “Occurrences”: Determine how many renewals should be taking place – for instance, if it is a monthly invoice to cover a 12-month contract, then the number should be 12.
- “Issue Date”: If the issue date is not on the same day on which you are creating the invoice, specify a date here. It will be useful since you can create an invoice and send it on a specific date in the future.
- “Send me a copy of the newly generated invoices”: If you tick this checkbox, it will send a copy of each newly generated invoice to your email address, regardless of what you have selected with the Invoicing “Method”.
- “Display the “From” and “To” dates in the invoice”: If you tick this checkbox, two new fields will appear under “Invoice Date” on the generated invoice showing “From” and “To” ( the period that this invoice covers ) you can change the “From Date” and “To Date” labels by modifying the “Invoice Layout”.
- Enable automatic payment for this invoice: This option works with online payments such as “Stripe” payment gateways only, once your client pays any invoice using “Stripe”, he will be automatically charged for any invoice automatically generated if this checkbox is active.
- Other options:
- Payment Terms: Enter the number of days in which the invoice will be due at (for example you would enter 14 when the invoice is due within 14 days from the issue date).
- Select the invoicing “Method”, “Currency”, and “Client”.
- “Method”: if you have selected “Send via email” you will be obligated to enter the client’s email address. You will be able to set the client’s online login details and set automatic email reminders to be sent concerning the unpaid invoices. In addition to, that client can pay the invoice online after approving your terms & conditions.
- “Currency”: If you wish to be dealing with a different currency for this invoice, click the underlined “Currency” code link next to the help symbol “Question Mark”. Your selection will overwrite your default currency setting.
- “Client”: Select the client whom will be invoiced or create a new client, the client’s data will appear highlighted in yellow where it can be reviewed and edited.
- Specify your product/service details.
- “Name”: Enter the product/service name or select a previously created product.
- “Details”: If you want to use one field only for describing your item, leave this field empty for all the items and it will not be showing on the invoice
- “Unit price”: Specify the price of the product/service
- “Quantity”: Specify the product quantity.
- “Tax1”, “Tax2”: Add one or more taxes. If the tax field is left blank it will not be displayed on the invoice.
- “Add New Line”: Add a new space for any other product or service
- You can add other special fields:
- “Notes”: The text entered here is in addition to the product or service descriptions in the main content/form of the invoice, allowing you to add further details, relating to the delivery, other payment details, or messages regarding any special offers.
- After finishing the invoice:
- Preview the invoice on “Web View” or in “PDF” format
- Save the subscription by clicking on the green “Save” button.
Please Note that:
- All the generated invoices will be sent to the client associated with the subscription and will be showing on the “Manage Invoices” page
- Through the “Recurring Invoices” tab you can track all the generated invoices and their payments progress etc..
Archives
- October 2022
- June 2022
- May 2022
- April 2022
- February 2017
- November 2016
- October 2016
- July 2016
- June 2016
- April 2016
- March 2016
- February 2016
- January 2016
- December 2015
- November 2015
- October 2015
- July 2015
- June 2015
- May 2015
- April 2015
- March 2014
- October 2013
- August 2013
- June 2013
- May 2013
- January 2013
- December 2012
