
Apr
14
2015
14
2015
How to Add New Clients on Online Invoices
To start invoicing your clients you will need to add them and you can do that by doing the following steps:
1- Through the “Clients” tab, Select the “Add New Client” option.
2- Add the new “Client Details”: Please Note only the required fields are (Your client’s business name, client number and client’s email address if you selected the “Send Via Email” Invoicing method).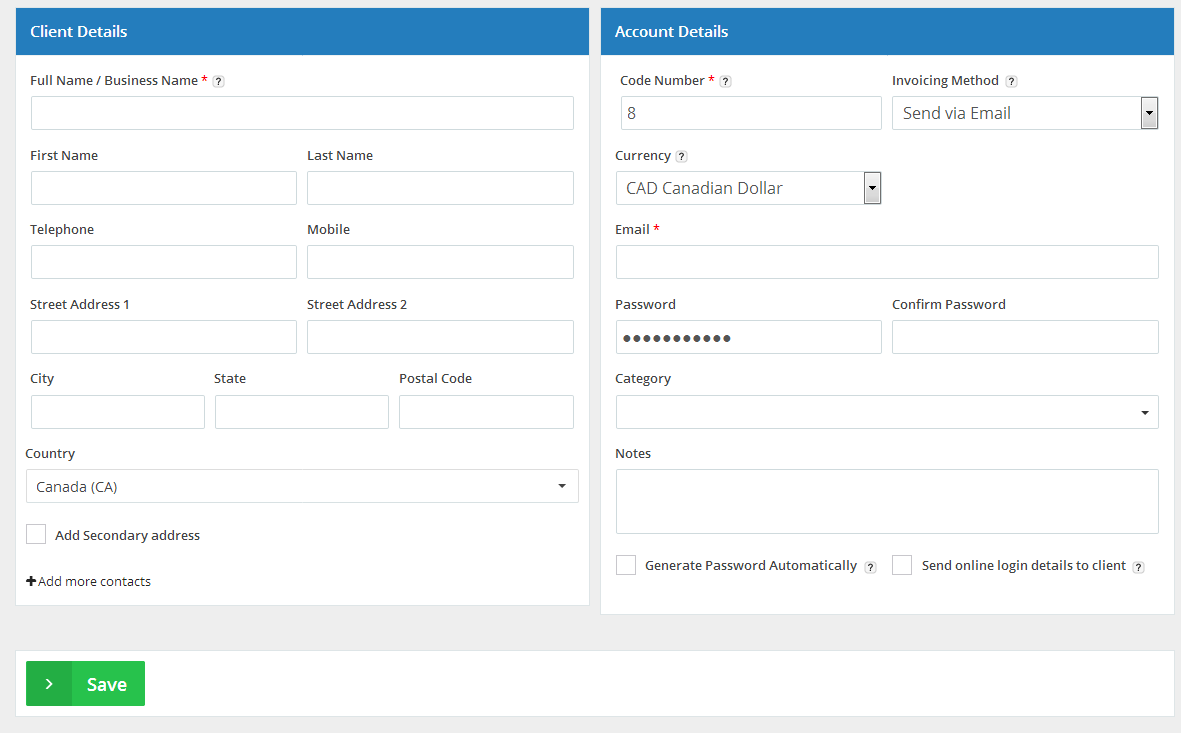
- Complete the “Client Details” field:
- “Business Name”: Enter the client business name here. If there is no organisation name, simply add the client’s full name, and leave the “First Name” and “Last Name” empty.
- Add your Client’s Business details: Name, Telephone numbers, and Address.
- Complete the “Account Details”:
- “Client Number”: By default, your system will automatically generate the next available client number. You can change the number if required (providing you with an option to select a number which has not been taken already) and the system will then select the next available number when you add your next client.
- “Invoicing Method”: You can select one of those methods:
- “Send Via email”: It is very mandatory to enter the client’s email address. Once this has been done you will also be able to;
- Set client online login details,
- Set automatic email reminders which are sent for the unpaid invoices.
- The client will be able to pay the invoice online after approving your terms & conditions.
- “Print” (Offline): You will not have to add the client’s emails if you chose this option, choosing this option will allow you to print only and invoice your clients offline.
- “Send Via email”: It is very mandatory to enter the client’s email address. Once this has been done you will also be able to;
- “Currency“: If using a different currency for a client is required (different than the default currency entered in the global settings), enter the required currency here. When this client is selected on the invoice creation page, the currency of the invoice will automatically change to the currency entered here.
- “Email”: Enter your client’s email address here.
- “Password”: Enter the password that your client uses to log in to the system
- “Generate Password Automatically”: If you selected this option a new password will be created by the system and then emailed to the client.
- “Send online login details t a client”: A new client password (and link to the site) will be emailed to the client’s email address.
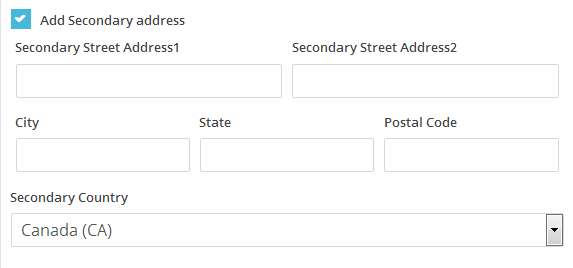
- “Add Secondary address”:
*
You can also add a “Secondary Address” or “Secondary Street Address” by ticking the checkbox on the left-hand side of the “Add Secondary Address” statement as showing in the figure below.
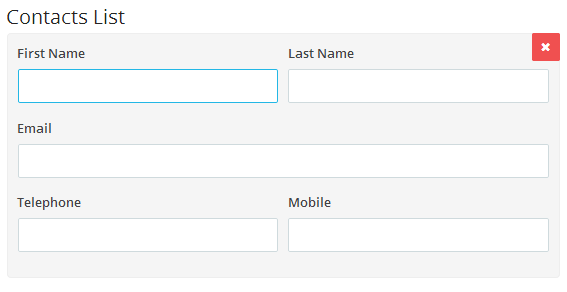
- “Add more contacts”: You can also add the “First Name” or “Last Name” of any contact you want to be adding to the contacts list as you can see in the below figure.
 Finally click on the “Save” button to save the new added client.
Archives
- October 2022
- June 2022
- May 2022
- April 2022
- February 2017
- November 2016
- October 2016
- July 2016
- June 2016
- April 2016
- March 2016
- February 2016
- January 2016
- December 2015
- November 2015
- October 2015
- July 2015
- June 2015
- May 2015
- April 2015
- March 2014
- October 2013
- August 2013
- June 2013
- May 2013
- January 2013
- December 2012
