
Jun
24
2015
24
2015
Creating Estimates on the Online Invoices System
Create a new estimate on the Online Invoices system:
- Through the “Invoice & Estimates” tab, Select “Estimates”. If you have activated the “Inventory management and control software” from the “Plug-in Manager” section, Then the “Invoice & Estimates” tab will be showing as “Sales”.
- Click the “New Estimate” button.
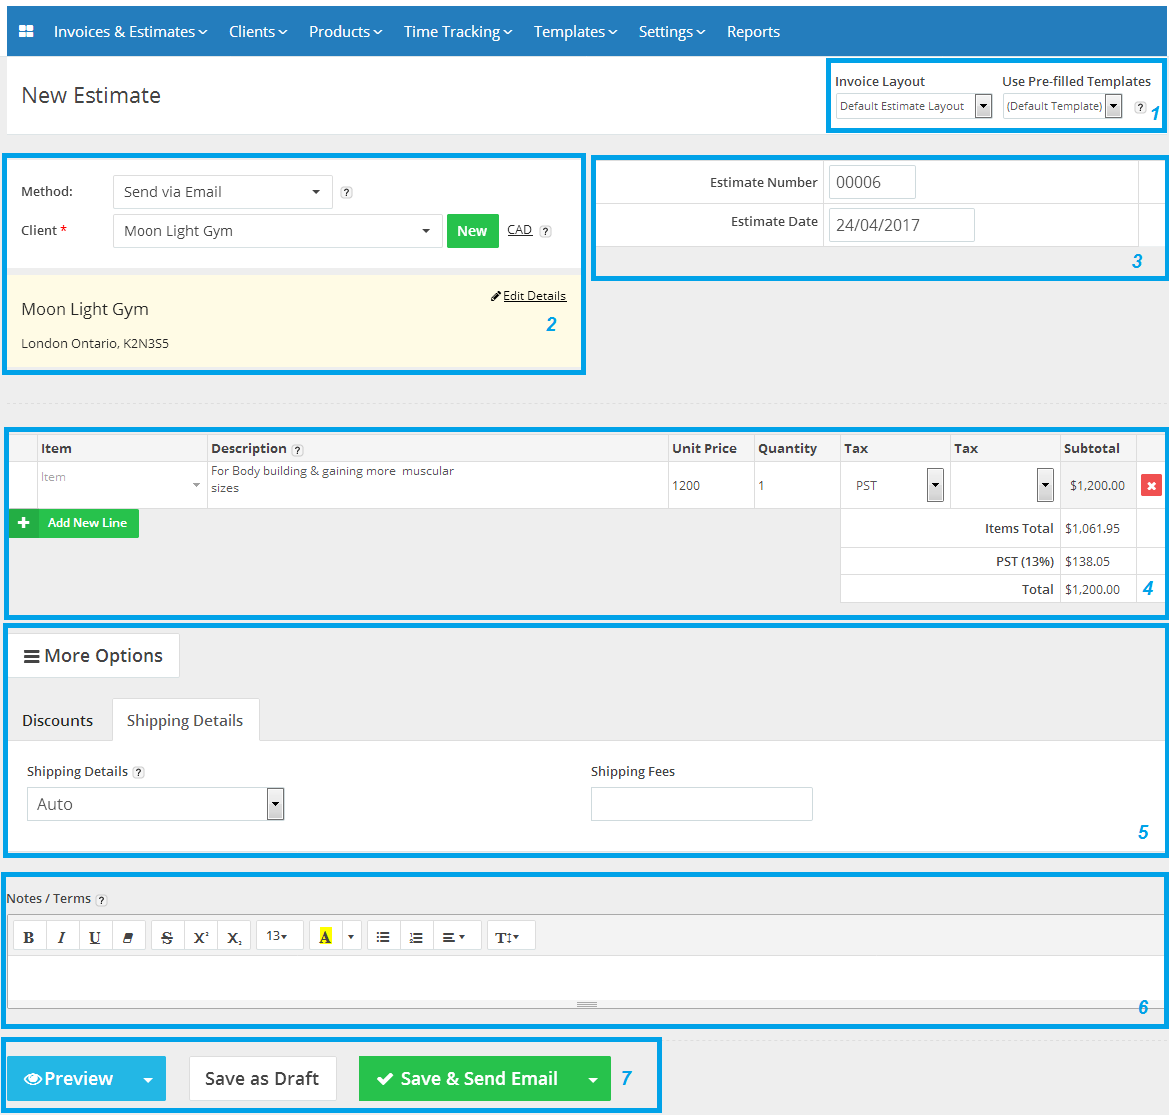
Anatomy of an estimate
- &
- Use a pre-filled estimate/invoice template: Select a pre-filled estimate/invoice from your saved “pre-filled invoice templates” for creating a new estimate of similar products or services quick and easy. Edit the estimate as required – client, discount, etc and then save as a new invoice.
- Select an Estimate/Invoice layout from what you have saved by clicking on “Invoice Layout Templates”.
- Select the Invoicing “Method”, “Currency”, and “Client”.
- Invoicing “Method”: If you selected “Send Via email” you will have to enter the client’s email address. You will able to set the client’s online login details and set automatic email reminders to be sent for the unpaid invoices. In addition to that, the client can pay the invoice online and approve your terms & conditions.
- “Currency”: If you wish to use a different currency for this invoice, click the underlined link with the currency code next to this help symbol “Question Mark”. please note that your selection will overwrite your default currency setting.
- “Client”: Select the client which will be invoiced or create a new client. The client’s data will appear highlighted in yellow where it can be reviewed and edited.
- Edit the “Estimate Number” and “Estimate Date”.
- Add your product/service details into the “Item” field.
- “Item”: Enter the product/service name or a previously created product.
- “Details”: If you want to use one field only for describing your item, leave this field empty for all items and it will not be showing on the invoice
- “Unit price”: Specify the price of the product/service.
- “Quantity”: Specify the product quantity.
- “Tax1″,”Tax2”: Add one or more taxes. If the tax field is left empty it will not be displayed on the invoice.
- “Add New Line”: Add a new space for another product or service.
- You can add special fields:
- Add a discount or deposit to an invoice
- Add “Shipping Details” & “Shipping Fees”: select whether if you want to display the client shipping address, show the main address automatically, show the secondary address or not to show it at all. also you can add your “
- “Shipping fees” as it will be added to your estimate’s total amount.
- Notes: The text entered here is in addition to the product or service descriptions of the main content/form of the estimate. It allows you to add further details, relating to the delivery, other payment details, or messages regarding any special offers.
- After finishing the estimate:
- “Preview” the estimate using “Web View” or in “PDF” format.
- Save the invoice as a draft by clicking on “Save as Draft”.

- Save and send the estimate to the client’s email by clicking on “Save & Send Email” and also you can avoid sending your estimate to your client by clicking “Save & Don’t Email”, However if you want to revise or send your estimate to another email address for the exact same client then you can click on “Send With Revised Email”
- “Save & Print” the estimate if you selected the “Print offline” invoicing method, also you can select to “Save & Don’t Print” your estimate.

Archives
- October 2022
- June 2022
- May 2022
- April 2022
- February 2017
- November 2016
- October 2016
- July 2016
- June 2016
- April 2016
- March 2016
- February 2016
- January 2016
- December 2015
- November 2015
- October 2015
- July 2015
- June 2015
- May 2015
- April 2015
- March 2014
- October 2013
- August 2013
- June 2013
- May 2013
- January 2013
- December 2012
